Starting instructions:
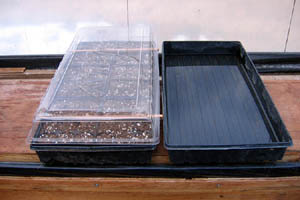
Sow seeds indoors in flats, trays or small pots 8 weeks
before your last frost date for transplanting outdoors. A plastic tray with 4 or 6 pack inserts works very well.
Fill the inserts with a fine starting mix soil or potting
soil. Pack the soil very lightly. Potting soil should be screened to 1/4" to remove any
large chunks. Thoroughly soak the soil and let drain before seeding. Do not use
garden soil.
Sprinkle 2-3 seeds in each pot on top of the moistened soil. Do NOT
cover the seed with soil. Mist the seeds with a spray bottle and cover the
tray with a plastic dome or sheet of light weight clear plastic film. Do not
seal tightly. Leave a corner propped up slightly to allow for some air exchange. Place in a
well lit area near a window or under grow lights where the temperature is a
constant 70-80 degrees. Do not exceed 85 degrees. Mist the trays daily and keep
the soil surface moist at all times during the sprouting period. The seeds will germinate in 7-14 days. Tobacco
seed germination is very temperature dependant. Lower temperatures will greatly
delay germination.
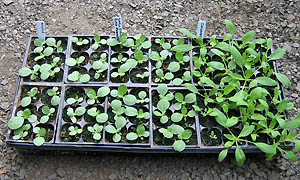
When the seeds finish sprouting and start to show their first
leaves, stop misting the seedlings, remove the plastic cover and
move the trays to a fully lit area such as a greenhouse, cold frame or under
grow lights. Florescent shop lights work well. Place the lights 3-4
inches above the seedlings. Keep the lights close so the seedlings don't stretch
for it and become leggy. Keep the soil moist, but do not over
water. Over
watering is the main reason for seedlings failing to grow properly and may
cause the seedlings to dampen off. It also impedes the roots downward growth. Water when the surface of the soil first begins to appear
dry on top. It is best to water
from the bottom up by soaking the tray of seedlings in a second tray without
drain holes filled 1 inch deep with water. Allow the seedling tray to soak for about
1/2 hour or until the water has wicked up and the soils surface appears wet
again. Remove the seedling tray from the watering tray and let it drain. Do not let
the seedlings stand in water
for a prolonged period. This will kill the developing roots.
Tobacco seedlings grow very slowly in the first 1-2 weeks. This is normal.
Thin seedlings to 1 per pot when they have developed 4 to 6 leaves.
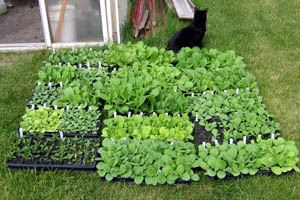
Tobacco seedlings can also be easily divided and repotted at about 4 weeks. Carefully
remove the plants from the pot and gently wash away the starting soil in a
small bowl of water by swishing the roots back and forth. Separate the bare root seedlings and repot them back into
new pots in the starting soil mix. Water them in thoroughly and place them out
of intense direct
sunlight for 2-3 days.
Planting instructions:
Set
the seedlings outside in filtered or dappled sunlight for 3-4 hours per day for a week before
planting out. This will help them acclimate and harden off the seedlings to an
outdoor environment especially if you have been using indoor artificial light. Plant the seedlings in
rows spaced 2 feet in all directions after the danger of frost has passed. Water
them in after planting and keep
the soil moist until plants are established. It is normal for plants to wilt
after transplanting and they may appear not to grow much during the first 1-2 weeks. All
the growth is taking place under ground at this stage. Once established, tobacco
requires little water. Fertilize lightly at planting and again in 4-6 weeks if needed.
About one month after
planting, tobacco plants start to go through a very rapid growth stage and will often
grow 2 to 3 inches per day. Flower buds will start to form at the tops during the
end of the second month. Cut the flower heads off when the 50% or more of
the plants have began to flower. This is the point when the plants are
considered to be mature. Topping helps force more energy into the leaves making them larger and thicker. Cut
off any suckers (side branches) when topping if they are present. Suckering is
best done when they are 2 inches long or more. This helps slow any re-growth. Leaves generally ripen
about 3 weeks after
topping and are ready to harvest when they turn yellow, or become a mottled
green and yellow with curled edges.
Harvesting
and curing:
Don't
rush to harvest. If you are unsure if the leaf is ripe
yet, then it probably is not. Picking them too green makes curing more
difficult. Leaves may be picked from the plant a few at a time as they ripen (primed) and strung on wire
or string with ½ inch of space between them for curing. In dry climates place
them closer together. Curing (aka color
curing) happens when chlorophyll in the leaf breaks down and the leaf changes
from green to yellow or brown. Bright Leaf strains are best primed to cure.
Other strains can be primed or cut and hung whole. Hang primed strings of leaf in an area where you
can maintain a daily average of 70%-80% humidity to cure. If the humidity is to
low, the leaf will not cure and will dry green. Tobacco
that fails to cure and dries green is usually unsmokable.
Drying and ageing.
After curing, dry the leaf until it is completely dry and the main stem snaps like a dry twig. It is very important to remove all the water from the main stem before packing for storage. Any moisture left in the stem or leaf may cause mold to grow during storage. Once cured and dried, the leaf can be left to hang and age where it is. Or it can be brought back into case (re-humidified until the leaf is pliable) and then packed into cardboard boxes or totes for storage and to age. Ageing allows time for nitrogen compounds in the leaf to break down which removes the harshness of freshly dried tobacco and lets the true flavors come through. Tobacco requires 3 to 6 months aging time for most strains to be at their best. Some strains need even longer. The natural aging process can be speeded up greatly by building a kiln where the temperature can be held at approximately 125 degrees and 70% humidity. Kilning tobacco (sometimes called fermenting) will speed up the natural aging process and the tobacco is smokeable in about 4 weeks. Plans for building small tobacco kilns are available on line.
For more information on
growing and harvesting, curing and drying, or building a kiln, visit our
friends at
http://fairtradetobacco.com